
- A+
Introduction
As we all know, Epson 380 printers are widely used all over the world due to their affordable price and high-quality prints. However, with frequent usage, the printer creates ink residue on the waste ink pad, which consists of a porous sponge material. Therefore, it's important to change the waste ink pad at regular intervals to maintain the printer's efficiency. In this article, we will guide you on how to replace the Epson 380 waste ink pad, which is also known as the waste ink collector pad.
Step-by-Step Guide to Replace Epson 380 Waste Ink Pad
Before beginning the replacement process, you should know that the process can be complicated and requires technical expertise. It is recommended to contact a professional technician or Epson customer services to avoid any damage to the printer. But if you are confident in your technical skills and want to do it yourself, follow these steps:
Step 1: Gather the Equipment
First, you need to gather all the necessary equipment such as gloves, a new waste ink pad, a screwdriver, a flashlight, and a container to collect the waste ink.
Step 2: Turn Off the Printer
Next, turn off the printer and unplug it from the power outlet. Wait for the printer to cool down as the process will be easier if the printer is cool.
Step 3: Remove the Printer Cover
After the printer has cooled down, open the printer cover to access the waste ink pad. You may need to use a screwdriver to remove the screws, depending on the model of your printer.
Step 4: Locate the Waste Ink Pad
Locate the waste ink pad, which is located at the bottom of the printer. You may need to use a flashlight to locate it as it might be hidden under some printer components.
Step 5: Remove the Old Waste Ink Pad
Once the waste ink pad is located, carefully remove it using gloves. Place it in the container you've prepared earlier to avoid any ink spills.
Step 6: Install the New Waste Ink Pad
Now that the old waste ink pad is removed, it's time to install the new waste ink pad. Carefully position the new pad in place of the old one. Ensure that it fits properly and there aren't any gaps.
Step 7: Reassemble the Printer
After installing the new waste ink pad, it's time to reassemble the printer. Put back all the components that you removed in step 3 and screw them back in place. Make sure the printer cover is properly seated to prevent any dust from entering the printer.
Step 8: Test the Printer
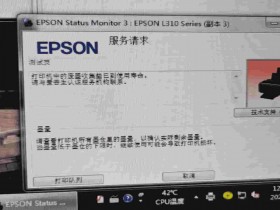
After reassembling the printer, connect it to the power source and turn on the power. Print a test page to ensure that the printer is working properly. Check the printer for any errors or warning messages. If the printer is working correctly, dispose of the old waste ink pad and container properly.
Conclusion
Replacing the waste ink pad is an important but complicated process that requires technical skills and expertise. Following these eight straightforward steps can help you ensure that your Epson 380 printer stays efficient and runs smoothly without any ink spills and ink pad overflow issues. Remember to wear gloves and work carefully when replacing the waste ink pad. In case of any doubts or technical problems, it's always better to contact a professional technician or customer services.