
- A+
Introduction
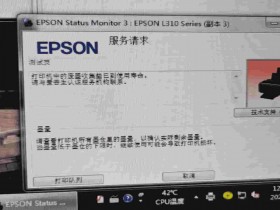
Epson L3150 is a high-quality printer that is widely used for its superior printing and scanning capabilities. However, with regular usage, the printer's waste ink pads become clogged and require cleaning or replacement. In this article, we will guide you through the process of replacing the Epson L3150 waste ink collector pads to keep your printer running smoothly.
Step by Step Guide
Step 1: Preparation
The first step is to switch off the printer and unplug the power cord. Also, make sure that the printer is not connected to any devices such as computers or power banks.
Step 2: Removing the Printer's Cover
Next, you will need to remove the printer's outer cover carefully. Locate the screws on the printer's back and use a screwdriver to remove them. After removing the screws, gently lift off the cover, starting from the back, and move towards the front. Be careful not to apply too much pressure, as it may damage the printer.
Step 3: Accessing the Waste Ink Pads
After removing the printer's cover, you will see the waste ink pads located at the bottom of the printer. The waste ink pads are rectangular sponges that absorb excess ink during the printing process. They need to be replaced periodically to ensure the printer's optimal performance.
Step 4: Removing the Old Waste Ink Pads
Locate the waste ink pads and carefully lift them out with tweezers. The pads are fragile, so make sure not to break them or tear them apart. Use a waste ink absorber and place it underneath the pads, which will absorb the excess ink. Dispose of the old ink pads that you removed.
Step 5: Installing the New Waste Ink Pads
Once you have removed the old pads, it is time to install the new ones. Place the new waste ink pads in the exact position as the old pads. Press them down gently to ensure they are secured in place.
Step 6: Resetting the Waste Ink Counter
After inserting the new waste ink pads, you will need to reset the waste ink counter to ensure the printer recognizes the new pads. You can do this by pressing and holding the reset button for 5-10 seconds. The printer will automatically reset its internal waste ink counter.
Step 7: Reassembling the Printer
After resetting the waste ink counter, carefully reassemble the printer by replacing the cover and tightening the screws you removed earlier. Plug in the power cord and turn the printer on. You may need to perform a few test prints to check if the printer is working correctly.
Conclusion
Replacing the Epson L3150 waste ink collector pads is simple and easy. By following the steps outlined above, you can keep your printer running smoothly and efficiently for years to come. Regular replacement of waste ink pads will also help prevent ink overflow, which leads to printer damage.