
- A+
Introduction
The Canon G3000 printer is a popular choice for home and office use. However, like all printers, it requires regular maintenance. One of the essential maintenance tasks is to replace the waste ink tank. This article will guide you through the process of replacing the waste ink tank in your Canon G3000 printer.
Step-by-Step Guide to Replacing the Waste Ink Tank
Before you start, ensure that you have the following items ready: a new waste ink tank, a pair of gloves, and a waste ink absorber kit (optional). Follow these simple steps to replace the waste ink tank in your Canon G3000:
Step 1 - Turn Off the Printer
The first step is to turn off the printer and unplug it from the power source. This step is necessary to prevent electrical shock and damage to the printer.
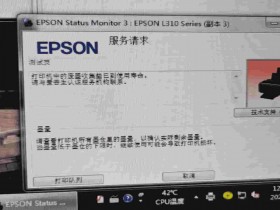
Step 2 - Access the Ink Cartridge Cover
Next, you need to access the ink cartridge cover. Lift up the top panel of the printer to access the ink cartridge holder. Then, press the open button to open the ink cartridge cover.
Step 3 - Remove the Old Waste Ink Tank
Locate the old waste ink tank in the printer. The waste ink tank is usually located on the right side of the printer. Using gloves, carefully remove the old waste ink tank from the printer. Dispose of the old waste ink tank in a safe and environmentally friendly way.
Step 4 - Install the New Waste Ink Tank
Take the new waste ink tank out of its packaging. Insert the new waste ink tank into the printer, lining up the tabs on the sides of the tank with the notches in the printer. Gently push the ink tank down until it clicks into place.
Step 5 - Reset the Waste Ink Counter
After installing the new waste ink tank, you need to reset the waste ink counter on your Canon G3000 printer. To do this, turn the printer on while holding down the "Stop" button until the "Alarm" light flashes four times. Then, release the "Stop" button. The waste ink counter is now reset, and your printer is ready to use.
Step 6 - Clean the Printer Head
After replacing the waste ink tank, it's a good idea to clean the printer head. This step will ensure that your printer prints high-quality documents and images. You can use a waste ink absorber kit to clean the printer head or follow the cleaning instructions in your printer manual.
Conclusion
In conclusion, replacing the waste ink tank in your Canon G3000 printer is a straightforward process that you can do at home. Follow the steps outlined in this article, and you will have a well-maintained and functional printer. Remember to dispose of your old waste ink tank in an environmentally friendly way to protect the planet.